


Prepare your palate for a dessert experience that truly lives up to its bold name! The Better Than Anything Cake, also sometimes called a “poke cake,” isn’t just a sweet treat—it’s a legendary, soul-satisfying confection that has become a staple at potlucks and family gatherings across the country.
It starts with a simple base of moist devil’s food or chocolate cake, but the magic happens after baking. The warm cake is pierced dozens of times, creating tiny wells that are flooded with a rich, silky stream of sweetened condensed milk and gooey caramel sauce.
This double-drenching transforms the ordinary into the extraordinary, ensuring every single bite is incredibly moist and decadent. Lock this deliciousness down for later—save this pin for the recipe—because once you try this effortless masterpiece, your search for the perfect, crowd-plepleasing dessert will be over.
The final, spectacular layer is a blanket of fluffy whipped topping, scattered with crunch from chocolate or toffee bits.
Better Than Anything Cake Recipe
Description
This recipe delivers a dessert so rich and luxurious, it earns the title "Better Than Anything Cake." It starts with a base of moist, airy chocolate sheet cake, providing the perfect tender canvas.
Once baked, the magic begins: the warm cake is systematically pierced, creating dozens of tiny wells ready to receive a lavish drizzle of thick, sweet caramel sauce and creamy, sweetened condensed milk.
These two liquids slowly seep into every crevice, transforming the cake's texture into an incredibly moist, gooey foundation.
After chilling, this foundation is crowned with a cloud of light, velvety whipped topping. Finally, the entire magnificent creation is scattered with crushed toffee bits (like Heath bars or Skor), adding an essential, delightful crunch and a buttery, nutty flavor contrast.
The result is a simple yet show-stopping layer of chocolate, caramel, cream, and toffee that is irresistible—a true celebration of decadence in every bite.
Ingredients
Instructions
-
Prepare and Bake the Chocolate Base
Preheat your oven to the temperature specified on your chocolate cake mix box, or set it to 350∘F. Follow the cake mix directions precisely, combining the mix with the required water, oil, and eggs in a large bowl. Ensure the batter is smooth and lump-free. Pour this mixture into a prepared 9×13-inch baking dish (sprayed with non-stick coating) and bake for the directed time, or until a thin skewer inserted into the center emerges clean. Remove the cake from the oven and let it stand for 10 minutes.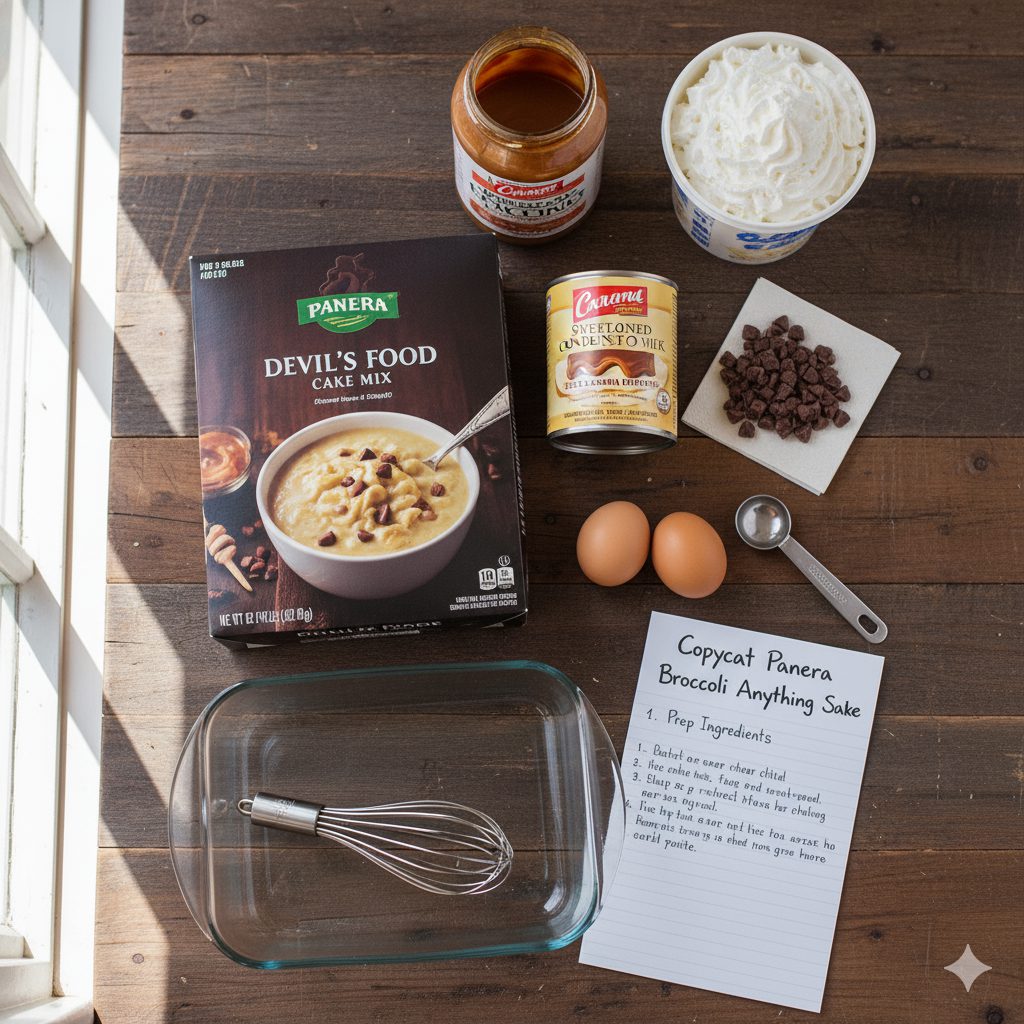
-
Create the Infusion Channels
While the cake is still warm from the oven, you must create pathways for the rich filling. Using the round handle of a wooden spoon, methodically press holes across the entire surface of the cake. Aim to make these channels approximately half an inch apart and push the spoon almost all the way to the bottom of the pan. The warmth of the cake helps the edges of the holes remain open, which is critical for maximum absorption.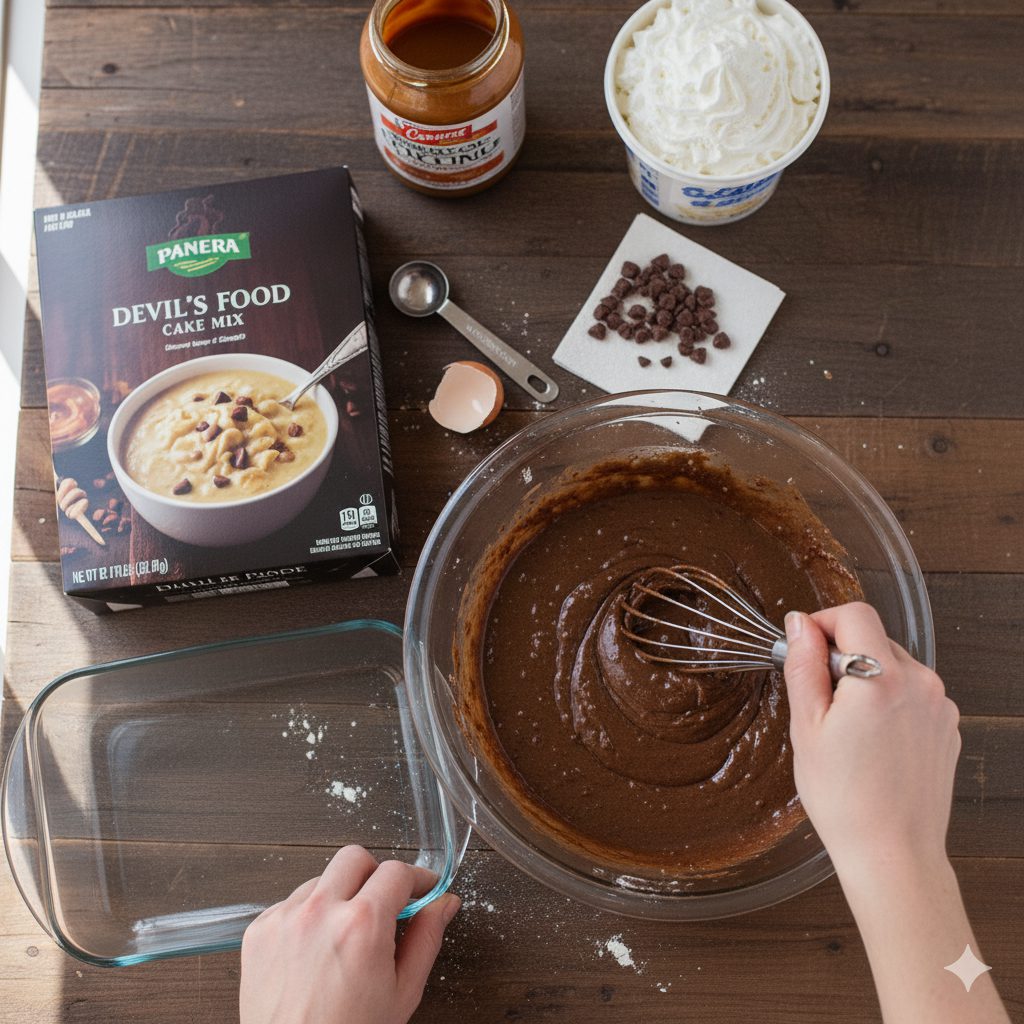
-
Combine and Heat the Liquid Filling
In a separate small saucepan, combine the full can of sweetened condensed milk with your caramel topping (or sauce). Place the saucepan over a low heat and gently stir the two ingredients together until the mixture is uniform and pleasantly warm. This slight warming makes the sauce more fluid, allowing it to easily seep into the holes and saturate the cake deeper than cold sauce would. -
Saturate the Cake with Caramel Bliss
Working slowly, drizzle the entire warm caramel-milk blend over the perforated surface of the cake. Focus especially on guiding the sauce directly into the holes you created, using the back of a spoon if necessary to gently coax the liquid over the entire top layer. Allow the cake to remain on the countertop for at least 15 minutes. During this period, the porous cake will greedily drink up the sweet, creamy filling.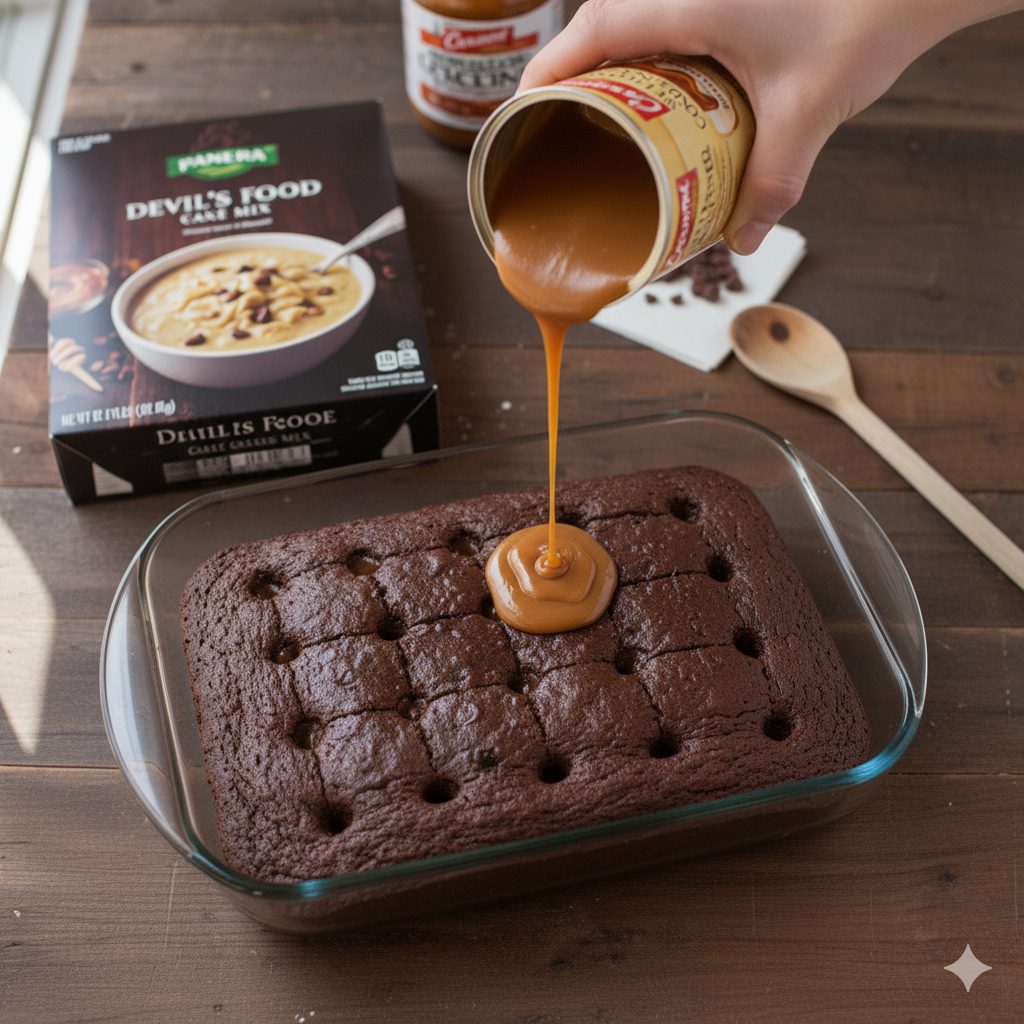
-
Chill to Perfection
Once the liquid filling has visibly sunk into the cake's structure, cover the baking dish tightly with plastic wrap. Transfer the covered cake to the refrigerator and allow it to chill for a minimum of two hours (or preferably overnight). This extended chilling time is non-negotiable, as it allows the cake to fully set and solidify the caramel-milk filling, resulting in a firm, irresistibly moist texture. -
Finish with Crunch and Cream
Just before you are ready to serve, retrieve the thoroughly chilled cake from the refrigerator. Unseal your container of whipped topping (which should be thawed) and carefully spread it evenly across the entire top surface of the cake, forming a smooth, white cloud. Immediately before slicing, liberally scatter the crushed toffee bits over the whipped layer for that essential buttery crunch. Slice and serve directly from the pan.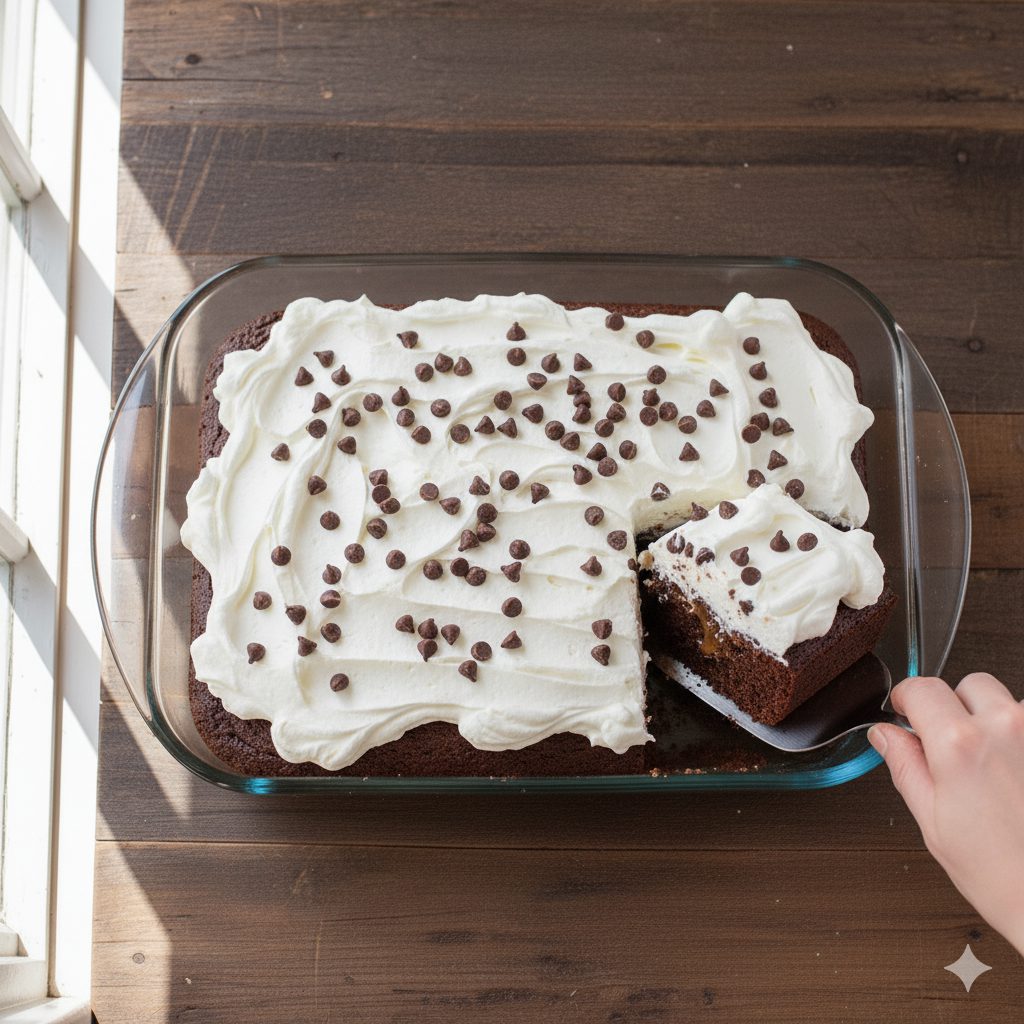
Nutrition Facts
Servings 16
- Amount Per Serving
- Calories 480kcal
- % Daily Value *
- Total Fat 24g37%
- Saturated Fat 10g50%
- Cholesterol 50mg17%
- Sodium 450mg19%
- Total Carbohydrate 65g22%
- Dietary Fiber 2g8%
- Sugars 50g
- Protein 6g12%
* Percent Daily Values are based on a 2,000 calorie diet. Your daily value may be higher or lower depending on your calorie needs.
Note
The aptly named "Better Than Anything Cake"—a beloved, ultra-moist poke cake—is an indulgent creation of rich chocolate cake saturated with a dual-caramel blend and crowned with a fluffy whipped topping and crunchy toffee.
It’s a perennial favorite because it transforms a simple boxed mix into a decadently layered masterpiece. The following guide provides essential baking tips, creative variations, sophisticated serving tricks, and practical storage advice to elevate this quintessential dessert.
Mastering the Recipe: Essential Tips and Tricks
Achieving the perfect, unbelievably moist texture of this cake hinges on a few crucial details:
The Penetration Point (The Poke Technique)
- Timing is Key: The optimal moment to poke the cake is immediately after it emerges from the oven—it should still be warm. The heat helps the viscous sauces flow and absorb more readily, preventing pooling on the surface.
- The Right Tool: Forget the fork; the holes are too small. The best tool is the round handle of a wooden spoon or a thick wooden dowel. The holes should be wide enough to accept the sauces but should not pierce the bottom of the pan. Aim for holes roughly an inch apart across the entire surface.
- The Sauce Strategy: Pour the sweetened condensed milk first, focusing on filling the freshly made holes. The thinner consistency will seep into the cake structure. Follow quickly with the caramel sauce. Be patient; pause between pours to allow the layers to truly saturate the crumb.
The Whipped Topping Secret
- Cool Completely: Never, under any circumstances, top a warm or even slightly warm cake with whipped topping. The heat will melt the topping instantly, resulting in a runny, disastrous mess. Wait until the cake is fully chilled from its first refrigeration period.
- Stabilization: While commercial whipped topping (like Cool Whip) is convenient and stable, if you opt for freshly whipped cream, consider stabilizing it with a teaspoon of powdered gelatin or a small amount of cream cheese during whipping. This will prevent it from weeping or deflating prematurely.
Creative Variations and Flavor Adventures
While the classic chocolate, caramel, and toffee combination is flawless, the poke cake structure is highly adaptable. Use these unique ideas to customize the dessert for any occasion:
Thematic Base Swaps
- The "Nutty Espresso" Twist: Substitute the chocolate cake mix with a yellow or white mix and add 2 tablespoons of instant espresso powder to the batter. For the topping, swap the toffee for chopped pecans or walnuts and replace the caramel sauce with a dark mocha fudge topping.
- The "Tropical Dream" Iteration: Use a coconut or pineapple cake mix as the base. Infuse the holes with a blend of sweetened condensed milk and cream of coconut (like Coco Lopez). Top with whipped cream, toasted shredded coconut, and chopped white chocolate.
- The "Spice & Heat" Upgrade: Use a dark chocolate or Devil’s Food mix. Mix the sweetened condensed milk with a teaspoon of Chipotle chili powder for a subtle kick. Top with whipped cream, a drizzle of store-bought or homemade hot fudge, and crushed Churro-flavored almonds.
Topping Transformation
- Nuts and Crunch: Instead of standard toffee, try crushed espresso beans, candied ginger, crushed shortbread cookies, or finely chopped pecans coated in brown sugar.
- Candy Bar Mania: Use chopped Snickers, Twix, or even Reese's Peanut Butter Cups for an immediate flavor shift.
- Finishing Drizzles: Alternate the top drizzle with raspberry liqueur, a hint of Kahlúa, or a rich maple syrup for added complexity.
Serving Tricks and Presentation
Since this is a dessert designed to be served directly from the baking dish, presentation focuses on the garnish and delivery:
- The Clean Cut: Because of the dense, saturated bottom and the airy top, this cake can be messy to slice. For clean squares, ensure the cake is thoroughly chilled (ideally overnight).
- Elevating the Plating: Serve slices with an elegant dollop of extra whipped cream dusted with a touch of cocoa powder. For an upscale look, drizzle the plate with a thin crosshatch of warm caramel sauce before placing the slice down.
- Portion Control (Cupcakes): For events, bake the cake mix into large cupcakes. Poke holes in the center of each one, fill them with the sauces, chill, and top individually. This eliminates the need for slicing and is perfect for grab-and-go servings.
Storage and Shelf Life
The "Better Than Anything Cake" is a superb make-ahead dessert, largely due to the stabilizing effect of the sweetened condensed milk and the need for thorough chilling.
- Refrigeration: The assembled cake, due to the dairy in the whipped topping, must be stored in the refrigerator. It is excellent the day after preparation, allowing the sauces to fully meld. It remains fresh and delectable for 3 to 4 days.
- The Freeze Option (Base Only): The baked cake base, before the whipped topping is added, freezes exceptionally well. Wrap the pan tightly in plastic wrap, followed by a layer of aluminum foil, and freeze for up to one month. Thaw the cake overnight in the refrigerator before adding the whipped topping and candy garnish just prior to serving.
Conclusion
The Better Than Anything Cake earns its grand title not just for its deep, rich flavor, but for its deceptive simplicity. By focusing on the correct technique for saturation, being mindful of temperature before topping, and embracing the endless possibilities for flavor variation, this dessert transcends its humble beginnings as a boxed cake mix. It is a guaranteed crowd-plepleaser—a moist, caramel-soaked, chocolatey triumph that truly is, by all accounts, an unforgettable treat.
Pin this recipe to share with your friends and followers.