

There’s something deliciously nostalgic about baking cookies for Halloween: the warm smell that makes the house feel like a cozy haunted cottage, the scatter of crumbs on the counter, and the delight of turning ordinary sugar and butter into little edible characters.
Why these cookies work
These cookies are a soft-but-sturdy sugar cookie base that holds shape well for cutting into ghosts, pumpkins, bats, and tombstones. They’re lightly crisp at the edges and tender inside, and they take color and decoration beautifully — so you can go spooky, silly, elegant, or kid-approved kooky. The recipe is forgiving, so even if you’re not a pro decorator, you’ll get charming results.
Halloween Cookies
Description
These Halloween Cookies are built to be fun, fast, and wildly adaptable — perfect for a classroom party, a trick-or-treat handout, or a quiet night in with a mug of hot chocolate.
Below you’ll find an easy 6-step recipe, serving tips, clever tricks, variations to suit every baker, storage advice, and a short conclusion to tie it all together. Let’s make something that tastes like candy and looks like mischief.
Ingredients
Instructions
-
Dry mix
In a medium bowl, whisk together the flour, baking powder, and salt. Set aside. This keeps the leavening distributed evenly and prevents salty pockets in the cookie.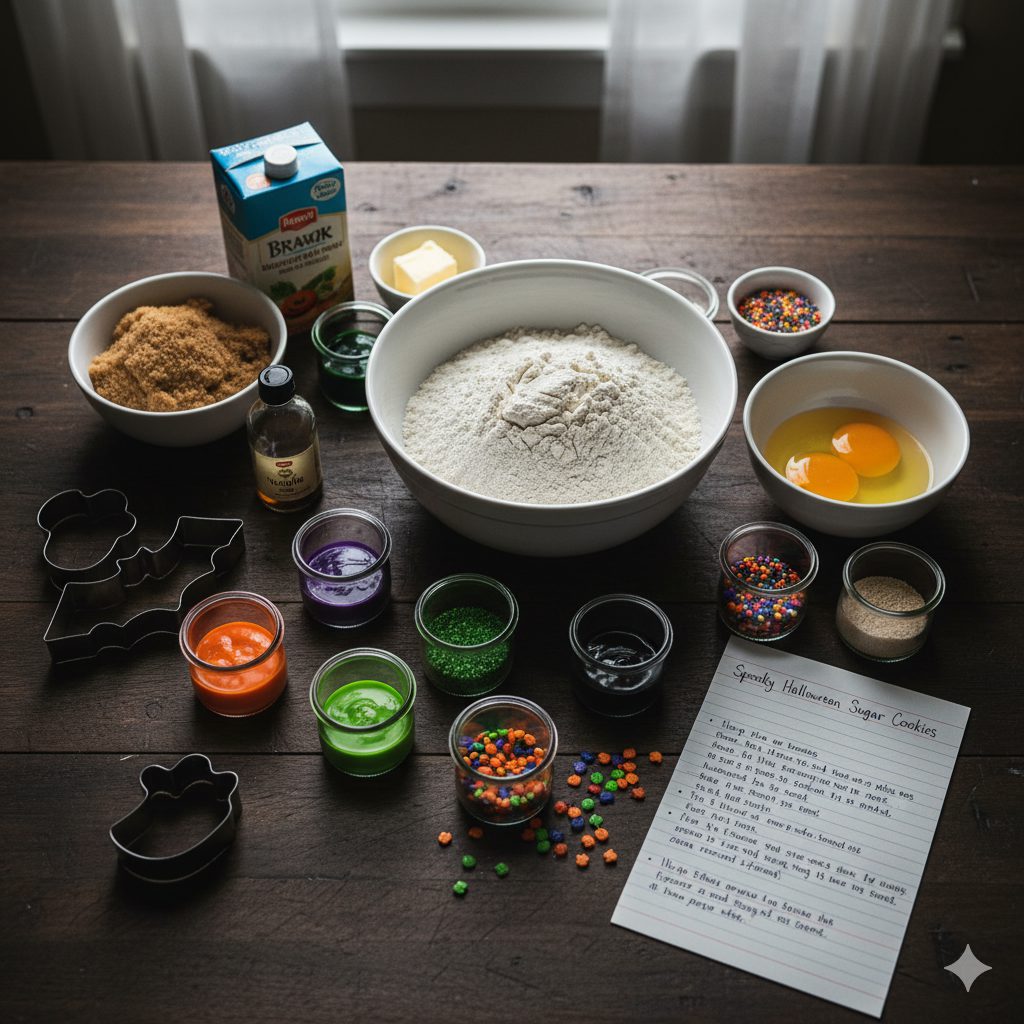
-
Cream butter and sugar
In a large bowl, beat the softened butter and sugar until pale and fluffy — about 2–3 minutes with an electric mixer. If you don’t have a mixer, vigorous stirring with a wooden spoon works; you’ll just need a little longer. Add the egg, vanilla, and orange zest and mix until fully incorporated. -
Combine wet and dry
Gradually add the dry ingredients to the butter mixture, mixing on low speed or folding with a spatula until the dough comes together. If the dough feels crumbly, add 1 tablespoon of milk at a time until it holds together but is still slightly firm. -
Chill and roll
Divide the dough into two discs, wrap each in plastic, and chill for at least 30 minutes. Chilling firms the butter so the cookies keep their shape while baking. Once chilled, roll dough between two sheets of parchment to about 1/4-inch thickness. Use Halloween-themed cutters to stamp out shapes. Re-roll scraps once or twice — avoid overworking the dough.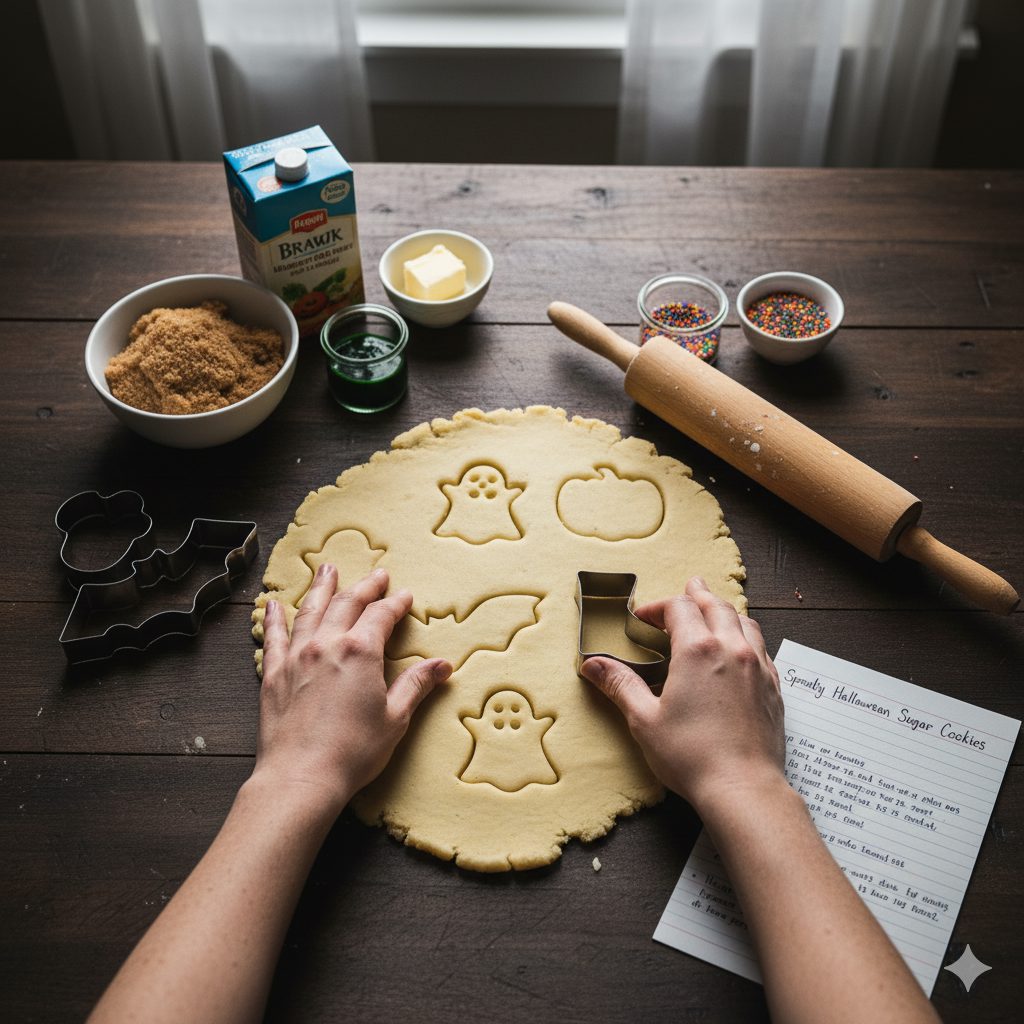
-
Bake
Preheat the oven to 350°F (175°C). Place cutouts on a parchment-lined baking sheet about 1 inch apart. Bake for 8–11 minutes, until edges are just set and barely golden. Timing depends on cookie size—smaller shapes will be at the lower end. Remove from oven and let cookies cool on the sheet for 5 minutes, then transfer to a cooling rack.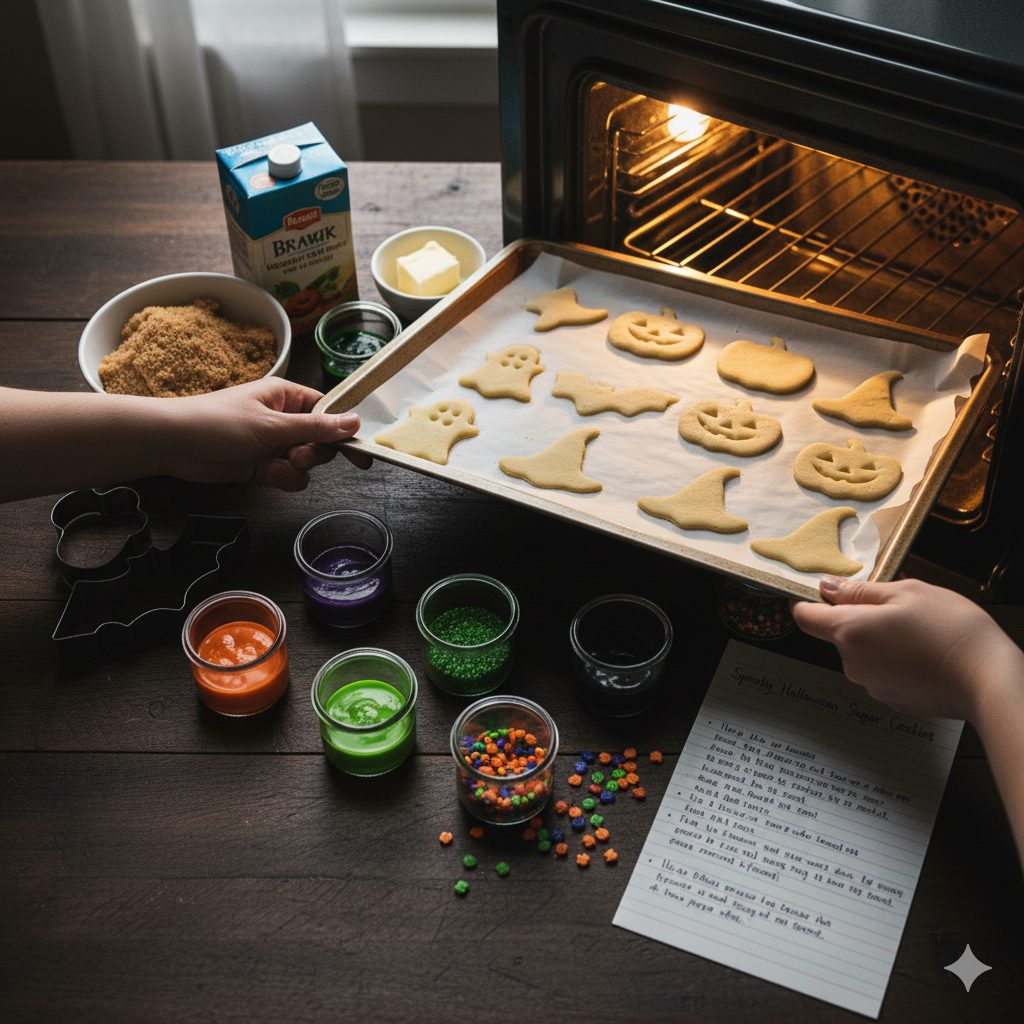
-
Decorate
When cookies are completely cool, decorate with royal icing, piped details, sprinkles, and edible eyes. For glossy finishes, tint your royal icing with gel food coloring and pipe outlines first, then flood the centers. Add accents (chocolate chips for eyes, orange sugar for pumpkins) before the icing sets.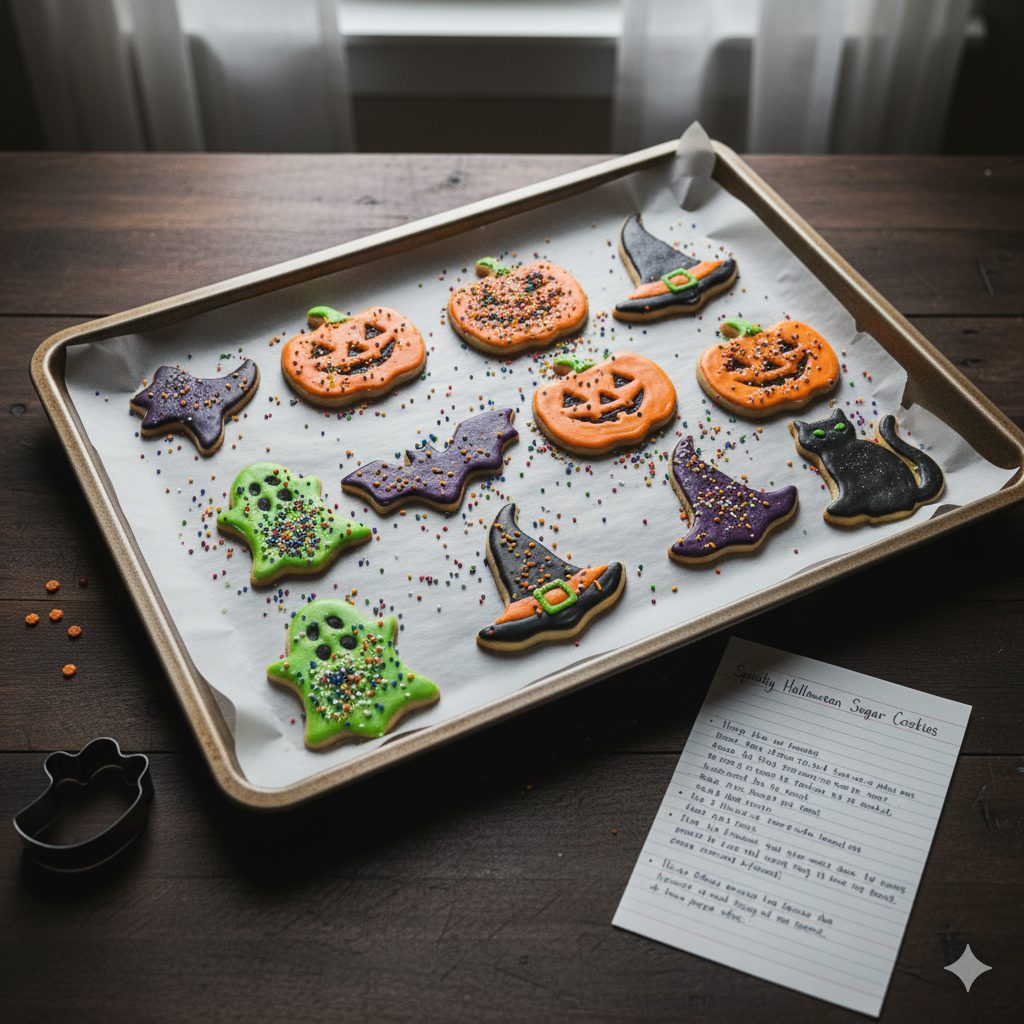
Nutrition Facts
Servings 24
- Amount Per Serving
- Calories 420kcal
- % Daily Value *
- Total Fat 18g28%
- Sodium 420mg18%
- Total Carbohydrate 64g22%
- Dietary Fiber 1.5g6%
- Sugars 32g
- Protein 5g10%
* Percent Daily Values are based on a 2,000 calorie diet. Your daily value may be higher or lower depending on your calorie needs.
Note
Serving & presentation tricks
- For parties, arrange cookies on a tiered cake stand with orange and black paper liners. Add small LED candles (battery-operated) between tiers for atmosphere.
- Pack them in cellophane bags tied with black or purple ribbon for trick-or-treat giveaways. Use a hole punch on a small card to write “Happy Halloween!” and attach.
- Pair with a themed drink — “Witches’ Brew” hot chocolate (add green food coloring and top with whipped cream) or a spiced apple cider — to make a complete seasonal snack table.
- If serving to kids, include a cookie-decorating station with plain cookies, several icing colors, and toppings. It’s an activity and dessert in one.
Baker’s tips & tricks
- Soft butter is key: If it’s too warm the dough will spread; too cold and it won’t cream properly. Aim for pliable-but-not-greasy butter.
- Chill for clean lines: If detail matters, chill the cut cookies on the tray for 10 minutes before baking to reduce spreading.
- Use gel food coloring: It gives vibrant colors without thinning your icing. A tiny dot goes a long way.
- Practice piping on parchment: Before piping directly on a cookie, practice shapes on parchment so you get a feel for pressure and motion.
- Avoid humidity: On humid days, royal icing takes longer to set. If you’re short on time, use a dehydrator setting or place cookies in an oven warmed to 150°F (65°C) then turned off — open the door slightly and return later to cool. (Be careful and monitor closely.)
- Make ahead: The cookie dough can be frozen for up to 3 months; thaw in the fridge overnight before rolling.
Variations to mix things up
- Chocolate Halloween Cookies: Replace ½ cup of flour with ½ cup unsweetened cocoa powder for rich chocolatey shapes. Add mini white chocolate chips for contrast.
- Spiced Pumpkin Cookies: Add 1 teaspoon pumpkin pie spice and replace 2 tablespoons of flour with 2 tablespoons canned pumpkin for a softer, autumnal cookie. Chill longer before cutting.
- Gluten-free option: Substitute a 1:1 gluten-free flour blend and add 1/4 teaspoon xanthan gum if your blend lacks it. Texture will be slightly different but still delicious.
- Vegan swap: Use plant butter and a flax “egg” (1 tablespoon ground flax + 3 tablespoons water, chilled 10 min) and choose vegan icing.
- Decor-free “drop” cookies: If cutters intimidate you, scoop rounded tablespoons of dough onto the sheet and flatten slightly for rustic cookies — then top with candy eyes and sprinkles.
Storage
- They’ll stay fresh for 4–5 days. Keep decorated cookies separate from undecorated ones until icing sets.
- In the fridge: If your decorations include perishable items (cream cheese frosting, fresh fruit), refrigerate in a single layer with wax paper between layers for up to 7 days.
- Freezing: Freeze undecorated baked cookies in a single layer on a tray; once solid, transfer to a freezer bag for up to 3 months. Thaw at room temperature, then decorate. You can also freeze dough discs wrapped tightly and bake from chilled (add a couple of minutes to the bake time).
Quick troubleshooting
- Cookies spread too much: Dough was too warm or overworked; chill longer and reduce oven temperature by 10–15°F next time.
- Edges burn before centers set: Your baking sheet may be too thin; use a heavy sheet or lower oven rack. Also check oven temp with a thermometer.
- Icing cracks: Icing was too stiff or cookie shrank—use a thin flood icing and ensure cookies cooled completely before icing.
Conclusion
These Halloween Cookies are more than a recipe: they’re a tiny, joyful project that brings color, creativity, and a bit of spook to your kitchen. The base recipe is simple, reliable, and built for decorating experiments — whether you’re aiming for elegant black-and-gold skeletons or wildly wobbly monster faces that make kids giggle. Keep the process playful: imperfect decorations often have the most charm. Bake, decorate, and share — after all, Halloween tastes best when it’s shared.
Pin this recipe to share with your friends and followers.