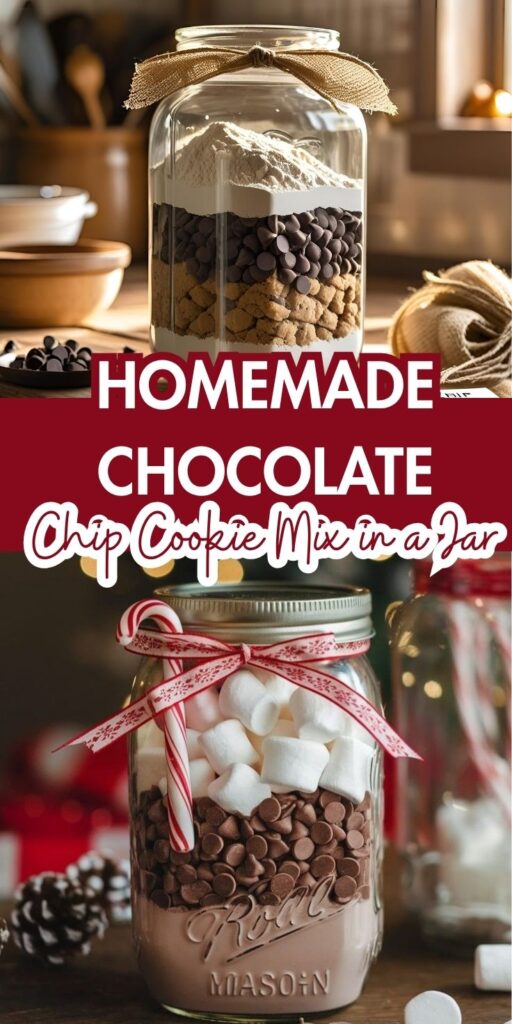

Homemade Chocolate Chip Cookie Mix in a Jar is a charming, thoughtful gift that’s perfect for any occasion. Layered with love and simple pantry ingredients—flour, sugar, baking soda, salt, and plenty of chocolate chips—this mix makes whipping up fresh cookies a breeze.
Just add a few wet ingredients like butter, eggs, and vanilla to transform the contents into warm, gooey chocolate chip cookies.
It’s not only convenient but also beautifully giftable with a ribbon and a handwritten tag. Whether for holidays, birthdays, or just because, this jar brings a homemade touch that’s both delicious and heartwarming.
Homemade gifts are some of the most thoughtful and cherished, and Chocolate Chip Cookie Mix in a Jar is a sweet classic that never goes out of style.
Whether you’re putting together a last-minute present, preparing ahead for the holidays, or simply stocking your pantry for easy baking, this jarred cookie mix is a convenient and beautiful solution. It’s budget-friendly, customizable, and absolutely delicious once baked!
Homemade Chocolate Chip Cookie Mix in a Jar
Description
Homemade Chocolate Chip Cookie Mix in a Jar is a thoughtful, delicious gift that's as fun to make as it is to receive.
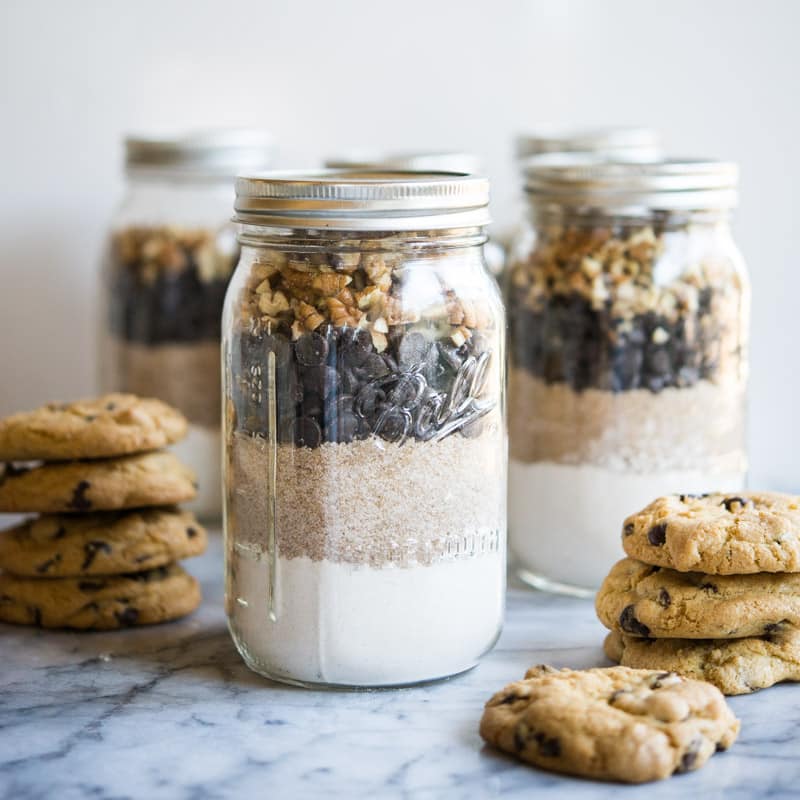
Neatly layered with flour, sugar, brown sugar, baking soda, salt, and chocolate chips, this jar creates bakery-style cookies with just the addition of butter, egg, and vanilla.
Perfect for holidays, birthdays, or hostess gifts, it combines convenience with a personal touch.
Beautifully presented with a ribbon and tag containing baking instructions, it’s a charming DIY treat for all ages.
This mix stays fresh for weeks and is a creative way to share homemade warmth and sweetness.
Ingredients
Optional additions:
Instructions
-
Layering Instructions
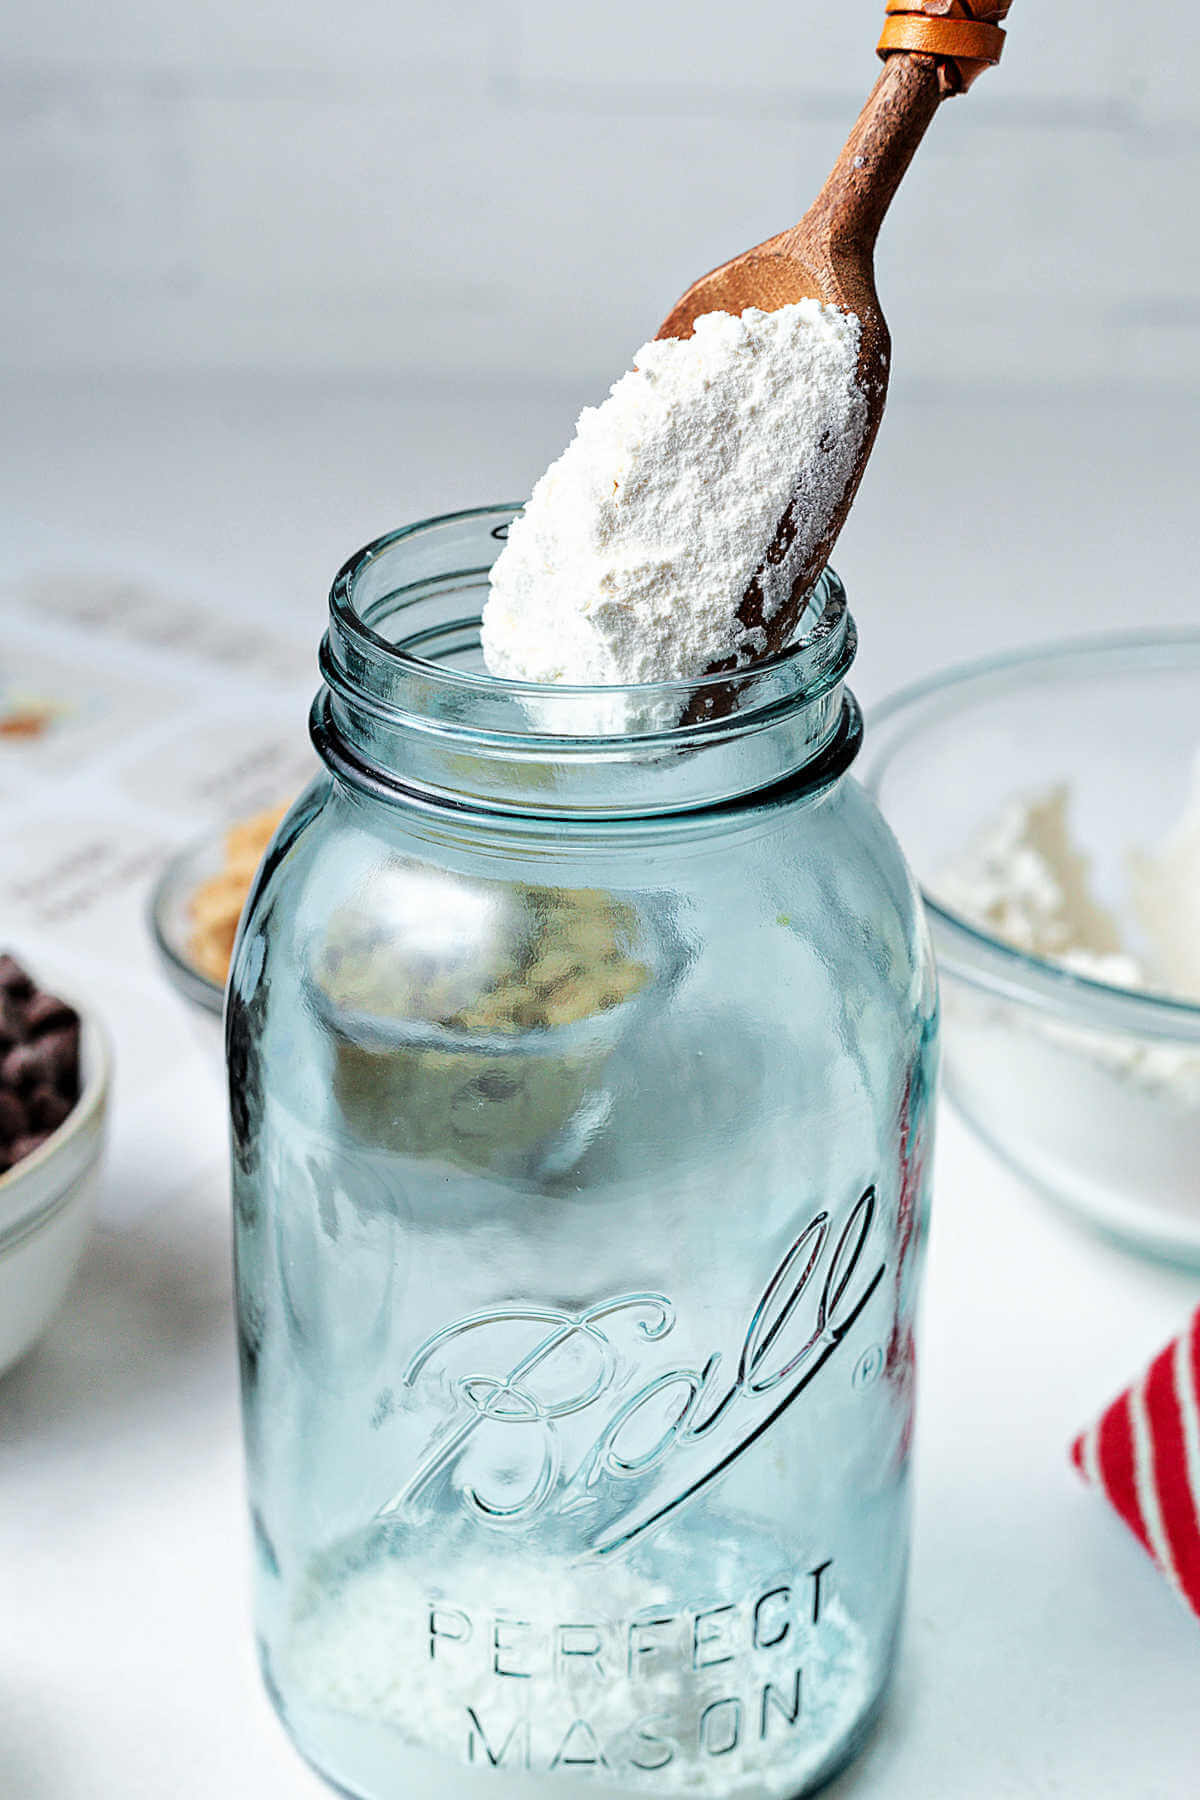
Use a 1-quart (32 oz) mason jar with a wide mouth. Add each ingredient in the following order, pressing down lightly between layers for a neat, even look: Flour Layer: Whisk the flour, baking soda, and salt together in a bowl.
Pour this mixture into the bottom of the jar using a funnel. Tap the jar gently to level.
Brown Sugar Layer: Pack the brown sugar firmly on top of the flour. Use the back of a spoon or tamper to press it evenly.
White Sugar Layer: Pour the granulated sugar over the brown sugar. Shake gently to level.
Chocolate Chip Layer: Add the chocolate chips on top. If using nuts, layer them last.
Seal the jar with the lid and decorate with ribbon or fabric if giving as a gift.
-
Gift Tag Instructions
Include a label or tag with the following baking directions: -
Chocolate Chip Cookies (from your jar mix)
Preheat oven to 350°F (175°C). In a large bowl, beat softened butter, egg, and vanilla until smooth.
Add the entire contents of the jar and mix until combined. Scoop tablespoon-sized balls onto a parchment-lined baking sheet.
Bake 10–12 minutes or until edges are golden brown.
Cool on the pan for 5 minutes, then transfer to a wire rack.
Enjoy your homemade cookies!
Nutrition Facts
- Amount Per Serving
- Calories 180kcal
- % Daily Value *
- Total Fat 9g14%
- Saturated Fat 5g25%
- Cholesterol 15mg5%
- Sodium 80mg4%
- Total Carbohydrate 24g8%
- Dietary Fiber 1g4%
- Sugars 15g
- Protein 2g4%
* Percent Daily Values are based on a 2,000 calorie diet. Your daily value may be higher or lower depending on your calorie needs.
Note
Making homemade chocolate chip cookie mix in a jar is not only a fun DIY gift idea but also a clever way to keep cookie cravings at bay.
Whether you're prepping ahead for busy weeks or creating charming edible gifts for holidays, this layered cookie jar mix is both beautiful and practical.
Below are helpful tips and tricks to ensure your cookies bake up deliciously every time, along with creative serving ideas.
Basic Ingredients for the Mix
A standard jar of chocolate chip cookie mix includes the following dry ingredients:
- All-purpose flour
- Baking soda
- Salt
- Brown sugar
- Granulated sugar
- Chocolate chips (semi-sweet or milk)
Optional additions include oats, chopped nuts, or M&M’s. Use a quart-size (32 oz) mason jar to fit all ingredients snugly.
Tips for Assembling the Mix
1. Layer Neatly for a Visual Wow-Factor
Carefully layer each ingredient to create a striped effect. Start with flour (mixed with baking soda and salt), followed by brown sugar (packed firmly), then granulated sugar, and top with chocolate chips or mix-ins. A funnel or clean spoon can help guide ingredients in neatly.
2. Press Each Layer Firmly
Use a tamper, spoon, or the base of a measuring cup to press down each layer, especially the brown sugar. This prevents shifting or mixing during storage or transit.
3. Seal Tightly and Add a Label
Ensure the lid is sealed tight to keep the mix fresh. Attach a label with the baking instructions and required wet ingredients, such as:
- 1 stick (½ cup) unsalted butter, softened
- 1 egg
- 1 tsp vanilla extract
Also include the baking temperature (typically 350°F / 175°C) and time (9–11 minutes).
4. Storage Tips
Stored in a cool, dry place, the mix stays fresh for up to 3 months. Use airtight glass jars to prevent moisture from entering.
Tricks for Perfect Cookies from the Mix
1. Use Room Temperature Ingredients
When baking, ensure your butter and egg are at room temperature. This helps the dough come together smoothly and bake evenly.
2. Chill the Dough (Optional for Thicker Cookies)
After mixing the dough, chill it for 30 minutes before baking. This trick yields thicker, chewier cookies.
3. Don’t Overmix
Once the wet and dry ingredients are combined, mix just until incorporated. Overmixing leads to tougher cookies.
4. Add Extra Chocolate Chips on Top
For picture-perfect cookies, press a few extra chocolate chips on top of each dough ball before baking.
Serving Ideas & Variations
1. Classic Chocolate Chip Cookies
Scoop 1.5 tbsp of dough per cookie for about 24 cookies per jar. Bake until golden around the edges for soft, chewy results.
2. Ice Cream Cookie Sandwiches
Bake larger cookies and let them cool completely. Sandwich a scoop of vanilla or cookie dough ice cream between two cookies for a decadent treat.
3. Skillet Cookie for Sharing
Mix the dough and press it into a greased 8-inch skillet. Bake for 15–20 minutes, top with ice cream, and serve warm as a shared dessert.
4. Gift Idea: Holiday Twist
Add seasonal M&M’s, crushed peppermint, or white chocolate chips to the jar. Decorate with festive ribbon and a handwritten tag for a personalized holiday gift.
5. Make It Vegan
Substitute the egg with a flax egg (1 tbsp ground flax + 2.5 tbsp water), and use plant-based butter and dairy-free chocolate chips for a vegan-friendly version.
Tips for Success
- Packing: Press each layer firmly to prevent mixing during storage or transit.
- Jar Type: Use a wide-mouth jar for easier filling and retrieval.
- Freshness: Use fresh ingredients, especially baking soda and flour, for best results.
- Customization: Swap chocolate chips for white chocolate, butterscotch, or M&Ms.
- Decoration Ideas: Use holiday-themed fabric or tags, twine, or mini wooden spoons tied to the jar.
Multiply for Bulk Gifting
This recipe can be easily multiplied to create several jars for gifting. Simply set up a little assembly line and funnel ingredients into multiple jars. It's a fun activity for kids or group events too!
Storage Instructions
- Room Temperature: Store sealed jars in a cool, dry place for up to 3 months.
- Gift Giving: Add a “best by” date on the tag or lid for clarity.
- Freezer Friendly: You can also store the dry mix in the freezer for 6+ months (make sure the jar is freezer-safe).
Final Thought
Homemade chocolate chip cookie mix in a jar is more than just a quick dessert—it’s a thoughtful, practical gift or a clever kitchen hack.
This Chocolate Chip Cookie Mix in a Jar isn’t just about baking—it’s about sharing a bit of love and warmth with others.
Whether you're preparing ahead for a busy holiday season or surprising a friend with a thoughtful gesture, this jar makes it easy for anyone to whip up a batch of delicious homemade cookies with minimal effort.
With the right layering, helpful tips, and a bit of creativity, you’ll always be ready to bake up a batch of fresh, warm cookies. Perfect for holidays, birthdays, or self-care Sundays!
Pin this recipe to share with your friends and followers.
Frequently Asked Questions
How long does the cookie mix stay fresh in the jar?
When stored in an airtight jar in a cool, dry place, the mix will stay fresh for up to 6 months. To maximize shelf life, use fresh, dry ingredients—especially the brown sugar, which can harden over time. Adding a small piece of parchment paper or a food-safe desiccant can help maintain dryness.
What ingredients should be added when baking the cookies?
The recipient of the jar will need to add wet ingredients such as:
-
½ cup (1 stick) of butter, softened
-
1 large egg
-
1 tsp vanilla extract
These ingredients are not included in the jar to avoid spoilage. Make sure to include a tag or label with these instructions and baking directions.
Can I customize the cookie mix with other add-ins?
Absolutely! While classic chocolate chips are traditional, you can substitute or add:
-
White chocolate or butterscotch chips
-
Chopped nuts (pecans, walnuts)
-
Dried fruit (cranberries, cherries)
-
Holiday-colored candies
Just be sure that any additions are dry and shelf-stable to avoid spoilage.
How should I layer the ingredients in the jar?
Layering makes the jar visually appealing and keeps ingredients from shifting. A good order is:
-
Flour mixed with baking soda and salt (bottom)
-
Brown sugar
-
Granulated sugar
-
Chocolate chips (top)
Pack each layer tightly with a spoon to prevent mixing. A wide-mouth quart jar works best.