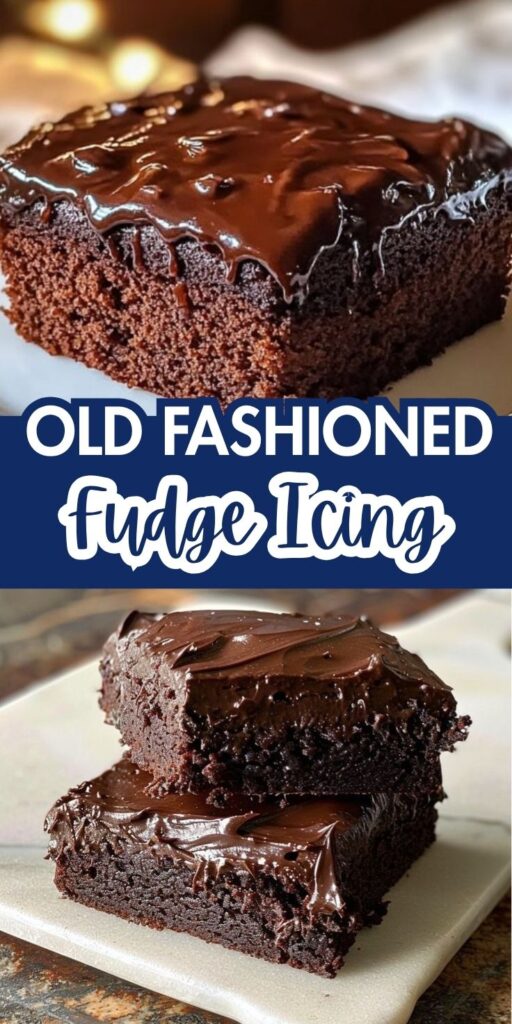

Old Fashioned Fudge Icing is a rich, nostalgic chocolate frosting that brings back the taste of classic homemade desserts. Made with simple pantry staples like cocoa powder, butter, sugar, and milk, this icing is cooked on the stovetop to create a smooth, glossy, and deeply chocolatey finish.
Once poured over cakes, brownies, or cupcakes, it sets into a fudgy, slightly crackly layer that’s irresistibly decadent.
Unlike modern buttercreams, this traditional recipe offers an old-school texture and flavor reminiscent of grandma’s kitchen. Perfect for chocolate lovers, Old Fashioned Fudge Icing adds a timeless touch to any homemade dessert.
Old-fashioned fudge icing is a rich, glossy, deeply chocolatey frosting that harks back to the days of homemade cakes baked from scratch in cozy kitchens.
Unlike modern buttercreams, which rely heavily on powdered sugar and whipped butter, this icing is cooked on the stovetop, much like candy, and sets into a smooth, slightly firm finish — reminiscent of classic fudge.
It’s perfect for icing layer cakes, sheet cakes, or even brownies, especially when you’re craving that nostalgic, melt-in-your-mouth texture with an intensely chocolaty punch.
Old Fashioned Fudge Icing
Description
Old Fashioned Fudge Icing is a rich, velvety, and deeply chocolatey frosting made from simple pantry staples like cocoa powder, sugar, milk, butter, and vanilla.
Cooked on the stovetop, it thickens into a glossy, pourable fudge that sets into a smooth, firm layer as it cools.
Ideal for sheet cakes, brownies, or cupcakes, this nostalgic icing delivers an old-time homemade flavor with a fudgy bite and crackly top.
It’s especially perfect for birthdays and vintage-style desserts, offering both texture and indulgence.
A beloved classic, this icing brings back memories of grandma’s kitchen and timeless comfort sweets.
Ingredients
Instructions
-
Prepare Your Workspace
Before you begin, make sure your cake is baked and completely cooled. This icing sets up quickly once it’s ready, so have your cake ready to frost and your utensils close by. A flat spatula or butter knife works well for spreading.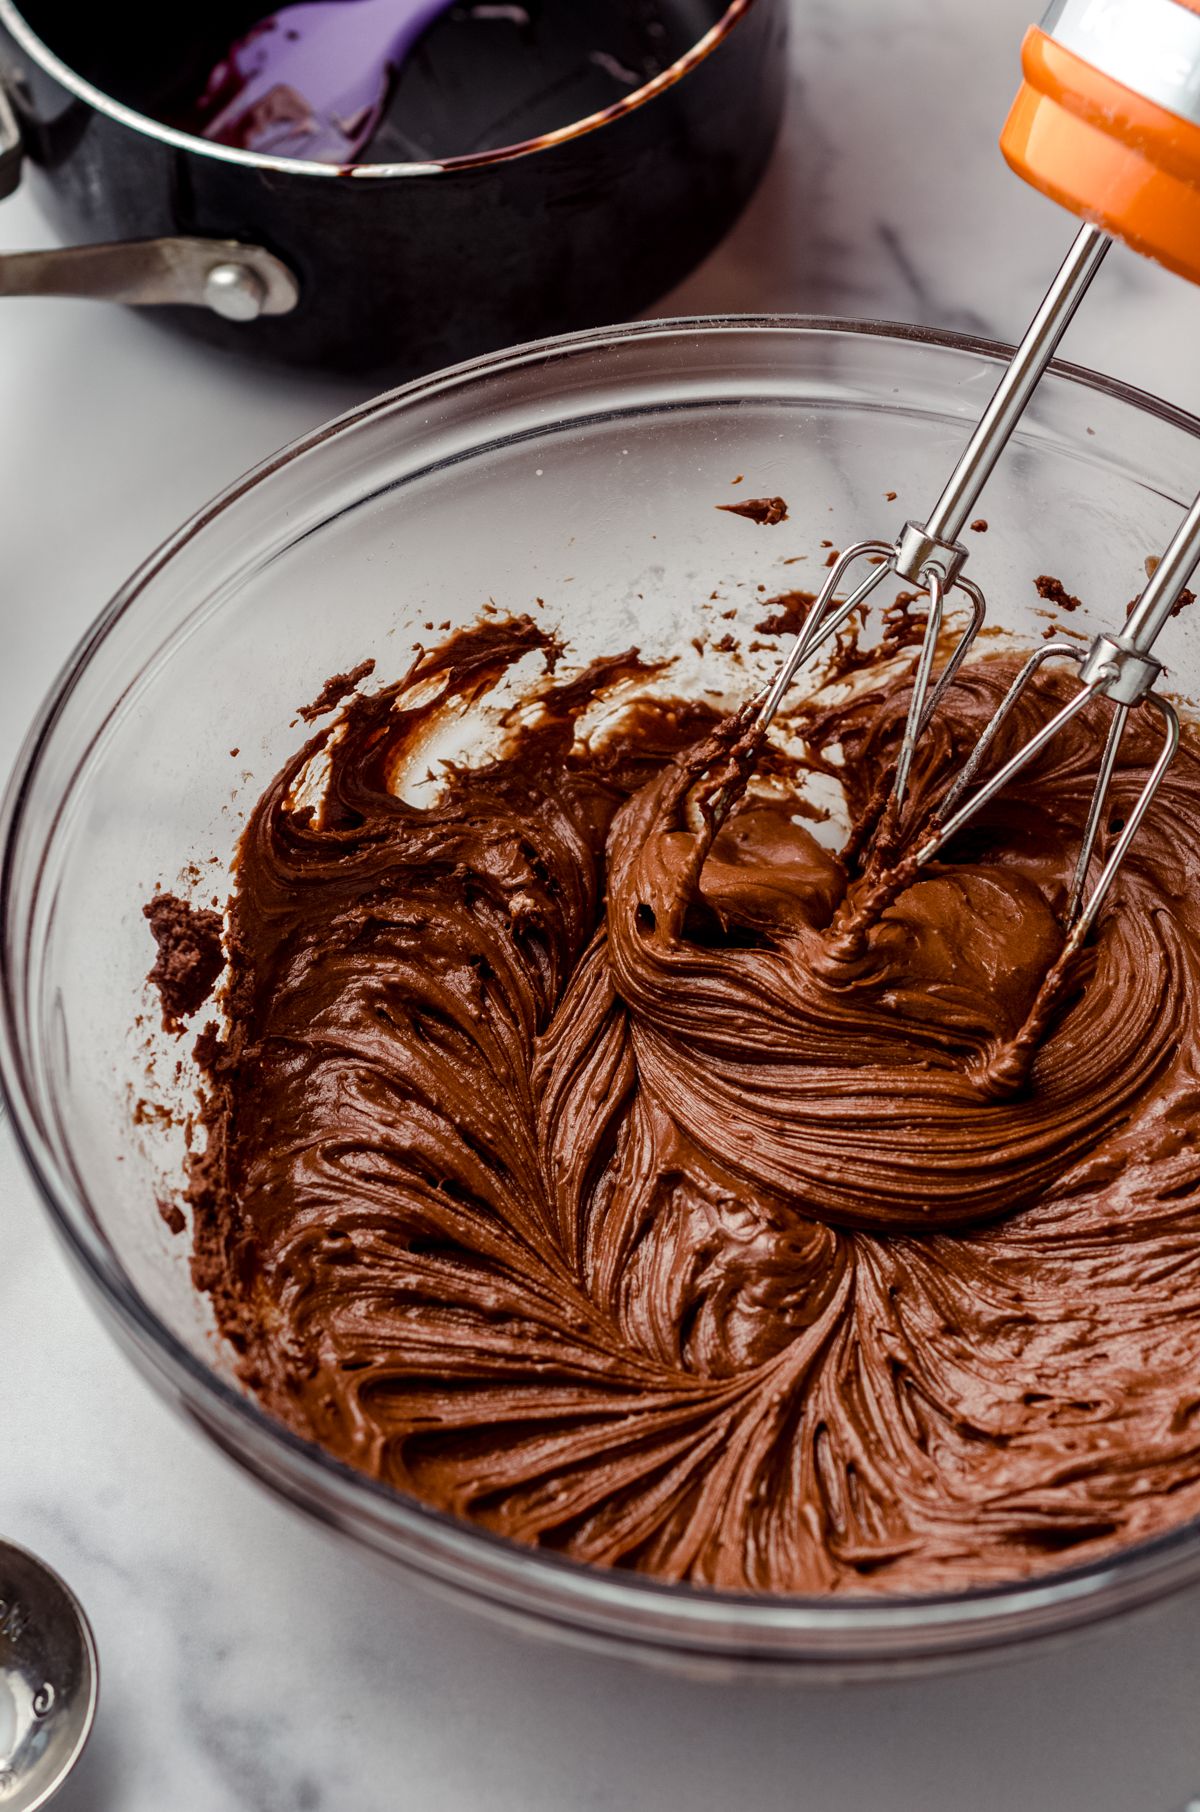
-
Combine the Base
In a medium heavy-bottomed saucepan, combine the sugar, cocoa powder, and salt. Stir them together with a whisk or wooden spoon to eliminate any lumps and to evenly distribute the cocoa through the sugar. -
Add the Milk and Butter
Pour in the milk and drop in the butter. Place the saucepan over medium heat and stir constantly. As the butter melts, the mixture will become glossy and the sugar will start to dissolve. -
Bring to a Boil
Once everything is smoothly combined and the butter is melted, increase the heat to medium-high and bring the mixture to a gentle boil, stirring frequently. Continue boiling for 2–3 minutes, or until the mixture reaches about 234–238°F (soft-ball stage) if using a candy thermometer. If you don't have a thermometer, look for small, slow bubbles and a thickened consistency. -
Remove from Heat and Stir in Vanilla
Take the pan off the heat and stir in the vanilla extract. Stir vigorously for about 2–3 minutes until the mixture begins to lose some of its gloss and thicken slightly. This cooling/stirring process helps develop the fudge-like texture. Be careful — it sets quickly once it begins to cool! -
Frost Immediately
Working quickly, pour the icing over the cake and spread it evenly using a spatula. The icing will firm up as it sits and become beautifully glossy and smooth with a soft, fudgy bite.
Nutrition Facts
Servings 24
- Amount Per Serving
- Calories 190kcal
- % Daily Value *
- Total Fat 10g16%
- Saturated Fat 6g30%
- Cholesterol 25mg9%
- Sodium 20mg1%
- Total Carbohydrate 28g10%
- Sugars 26g
- Protein 2g4%
* Percent Daily Values are based on a 2,000 calorie diet. Your daily value may be higher or lower depending on your calorie needs.
Note
Old-Fashioned Fudge Icing is a rich, velvety topping with deep chocolate flavor and a slightly firm, fudgy finish. It's perfect for sheet cakes, brownies, cupcakes, and more.
Unlike buttercream, which is light and fluffy, fudge icing has a dense, glossy texture that sets as it cools, delivering a nostalgic, old-school charm to homemade baked goods.
Essential Tips for Perfect Fudge Icing
- Use Real Ingredients:
Quality matters—use real unsweetened cocoa powder, real butter, and pure vanilla extract for best results. Evaporated milk or whole milk adds creaminess. - Watch the Temperature:
Many old-fashioned fudge icing recipes require boiling the mixture. Use medium heat and stir constantly to avoid burning. A candy thermometer isn’t always necessary, but aim for the soft-ball stage (235°F/113°C) if you want a firmer set. - Stir Smoothly:
Once the icing is off the heat, allow it to cool slightly before beating. Beat the icing until it becomes thick and glossy but still pourable. Over-beating can lead to a grainy texture, while under-beating can make it too runny. - Work Quickly:
Fudge icing sets fast, especially when the weather is cool. Pour it over your cake while it’s still warm and spread quickly before it firms up. - Don't Refrigerate Immediately:
Let the icing set at room temperature. Refrigeration can cause it to harden too quickly or develop a brittle texture.
Serving Tricks
- Pour While Warm:
To achieve that perfectly smooth, glossy top, pour the icing directly onto a slightly warm cake or brownies. The warmth helps it spread evenly and stick beautifully. - Create Swirls:
Use an offset spatula or butter knife to create attractive swirls before it fully sets. These subtle ridges give the cake an old-fashioned homemade look. - Top with Extras:
While the icing is still soft, sprinkle with chopped nuts, shredded coconut, mini marshmallows, or sea salt for extra texture and flavor. - Double Layer Cakes:
For a layered cake, allow the icing to cool a bit more before spreading between layers. This prevents it from running or thinning out. - Warm to Reuse:
If the icing sets too fast or becomes too firm, warm it gently over a double boiler or microwave in short bursts to soften it again.
Delicious Variations
- Peanut Butter Fudge Icing:
Add 1/4 cup of creamy peanut butter for a salty-sweet twist. It pairs beautifully with chocolate or banana cake. - Mocha Fudge Icing:
Stir in 1–2 teaspoons of instant espresso powder for a mocha depth. Great with chocolate or vanilla cakes. - Orange-Chocolate Fudge Icing:
Add 1 teaspoon of orange zest or orange extract to the fudge icing for a citrusy, sophisticated flavor. - Spiced Fudge Icing:
Try cinnamon, nutmeg, or cayenne for a Mexican chocolate flair. Ideal for fall-themed bakes. - Mint Fudge Icing:
Add a few drops of peppermint extract and top with crushed mint candies or chocolate chips for a refreshing twist.
Tips for Success:
- Timing is everything: Fudge icing can go from pourable to solid in a minute. Be sure to spread it right after stirring in the vanilla.
- Stir, but not too much: Don’t overstir during boiling — just enough to keep it from burning. Too much stirring during cooking can cause sugar crystals to form and make the icing grainy.
- Use a candy thermometer if possible: Reaching soft-ball stage (234°F) is the secret to getting the texture just right.
- Avoid high heat: Boiling too quickly can cause the mixture to scorch or separate.
Variations:
- Fudge-Nut Icing: Stir in 1/2 cup chopped toasted pecans or walnuts right after removing from heat for a crunchy twist.
- Coffee Fudge Icing: Add 1 teaspoon instant coffee or espresso powder to enhance the chocolate flavor.
- Dairy-Free Option: Substitute dairy-free butter and plant milk (like oat or almond) for a vegan-friendly version. Use caution with consistency — plant-based milks can affect the texture.
- Coconut Fudge Icing: Swap milk with canned coconut milk and top with shredded coconut for a tropical spin.
Best Cakes to Pair With:
Old-fashioned fudge icing pairs best with:
- Classic yellow cake
- Moist chocolate cake
- Buttermilk sheet cakes
- Sour cream or devil’s food cakes
- Even brownies or Texas sheet cake!
Its deep chocolate flavor and fudgy finish elevate even the simplest of cakes to a special occasion dessert.
Storage & Shelf Life:
- Once set, the icing holds well at room temperature for 2–3 days.
- For longer storage, refrigerate the iced cake in an airtight container for up to 5 days. Let it come to room temperature before serving for the best texture.
- You can also store the icing itself (before setting) in the fridge for up to 3 days, then reheat gently over low heat and stir until smooth before using.
Final Thoughts:
Old-fashioned fudge icing is the kind of recipe that never goes out of style. It brings the cozy charm of simpler times into your kitchen, offering a decadent finish without the need for fancy tools or techniques.
Whether you're baking for a family gathering, a birthday, or just a Tuesday night treat, this icing adds that perfect homemade touch — thick, glossy, sweet, and soul-satisfying.
Old-Fashioned Fudge Icing is the ultimate indulgence for chocolate lovers seeking nostalgic flavor and satisfying texture. Its rich, creamy base and quick-setting nature make it ideal for casual family desserts or special occasion bakes.
With a few smart tips and creative variations, this classic icing can be elevated to fit any theme, season, or flavor profile.
Whether you're pouring it over a Texas sheet cake, swirling it on cupcakes, or spreading it thick over brownies, this icing adds both flavor and elegance.
Pin this recipe to share with your friends and followers.
Frequently Asked Questions
What is Old-Fashioned Fudge Icing made of?
Old-fashioned fudge icing typically includes simple pantry ingredients: cocoa powder, sugar, milk, butter, and vanilla extract. The icing is cooked on the stovetop until thick and glossy, then poured over cakes or brownies. As it cools, it sets into a rich, fudge-like layer—perfectly smooth with a melt-in-your-mouth texture.
How is it different from regular chocolate frosting?
Unlike whipped buttercream or modern frostings, fudge icing is cooked, giving it a deeper, caramelized chocolate flavor and a slightly firmer texture. It sets as it cools, similar to fudge candy, while traditional frosting stays soft and fluffy. This icing works especially well on sheet cakes, pound cakes, or Texas sheet cake.
Can I make it ahead of time or store leftovers?
Fudge icing is best used immediately after cooking while it’s pourable. Once it sets, it becomes difficult to spread. However, leftovers can be stored in an airtight container at room temperature for up to 3 days or refrigerated for up to 1 week. To reuse, gently reheat in a saucepan with a splash of milk until smooth again.
Why does my fudge icing turn grainy or harden too quickly?
Graininess often occurs if the sugar doesn’t fully dissolve or the icing is overcooked. Use low to medium heat and stir constantly to prevent crystallization. Also, don’t skip the butter—it adds creaminess and helps prevent the icing from drying out too fast. If it thickens too quickly, stir in a bit of warm milk to loosen it.